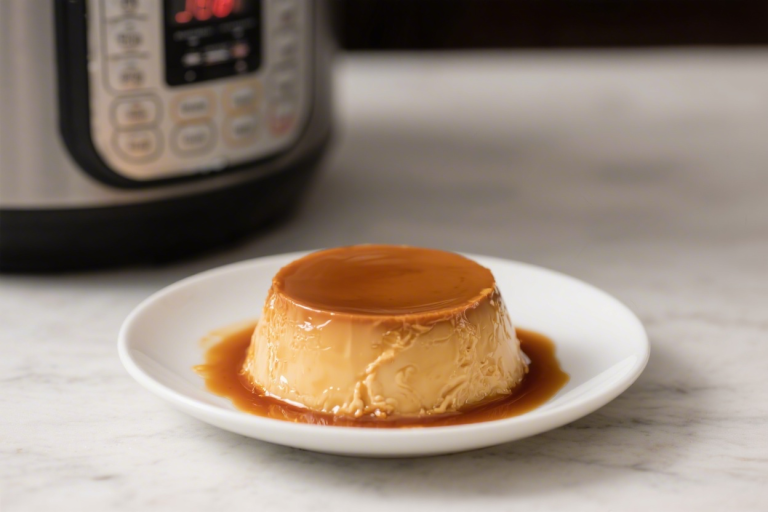
The Most Delicious Vanilla Bean Custard
There’s something special about a dessert that’s both simple and luxurious. This silky vanilla bean custard is classic comfort, but the pressure cooker makes it fast, consistent, and wonderfully smooth. No water baths, no oven guessing, just creamy custard with gorgeous specks of vanilla in every spoonful.
It’s elegant enough for company and easy enough for a weeknight treat.
What Makes This Recipe So Good
- Ultra-creamy texture: The gentle, even heat of a pressure cooker helps avoid curdling and delivers a smooth, velvety custard.
- Fast and reliable: Cooking under pressure drastically cuts time compared to a traditional oven bain-marie, with consistent results.
- Real vanilla flavor: Using a split vanilla bean (or quality extract) gives pure, warm flavor instead of artificial notes.
- Make-ahead friendly: Custards set beautifully in the fridge and taste even better after a short chill.
- Perfect portions: Ramekins make serving effortless and elegant, from family dinners to dinner parties.
Ingredients
- 2 cups (480 ml) whole milk or half-and-half
- 1 cup (240 ml) heavy cream
- 1 whole vanilla bean, split and scraped (or 2 teaspoons pure vanilla extract)
- 6 large egg yolks
- 1/2 cup (100 g) granulated sugar
- 1/8 teaspoon fine sea salt
- Optional: 1–2 teaspoons dark rum or brandy
- Optional topping: freshly grated nutmeg or a few raspberries
- For the cooker: 1 to 1 1/2 cups water, and a trivet
Step-by-Step Instructions
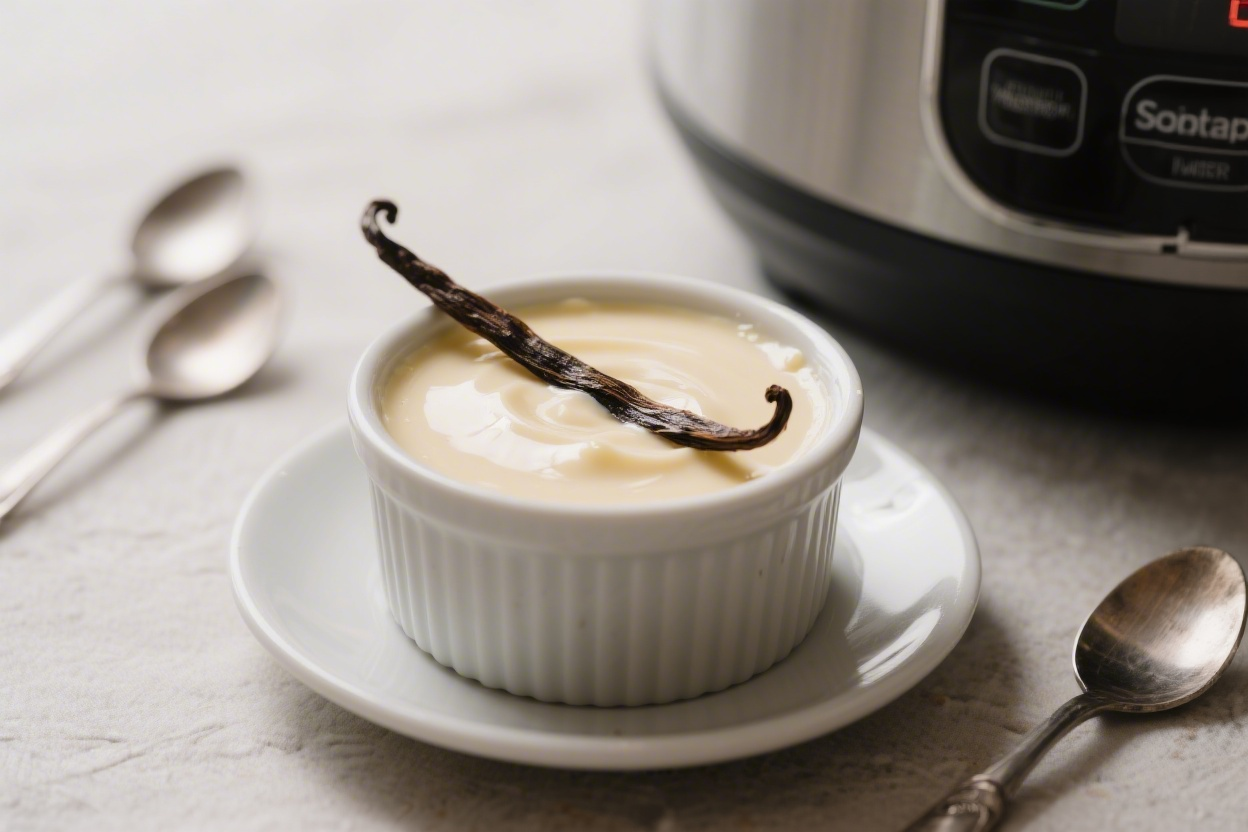
- Prep the ramekins: Lightly butter 6–8 small ramekins (4–6 ounces each). Set aside. Add the trivet and water to your pressure cooker.
- Warm the dairy: In a saucepan, combine milk (or half-and-half) and cream.
If using a vanilla bean, scrape the seeds into the pan and add the pod. Heat over medium until steaming and just below a simmer. Do not boil.
Remove from heat and let steep 10 minutes. If using extract, don’t add it yet.
- Whisk the base: In a mixing bowl, whisk egg yolks, sugar, and salt until slightly thickened and lighter in color, about 30–45 seconds. You’re looking for a smooth, cohesive mixture.
- Temper the eggs: Slowly pour the warm dairy into the yolk mixture while whisking constantly.
This prevents scrambling. If using vanilla extract and/or rum, whisk it in now. Discard the vanilla pod if used.
- Strain for silkiness: Pour the custard through a fine-mesh sieve into a large measuring cup or bowl with a spout.
This removes any bits of egg and ensures a smooth texture.
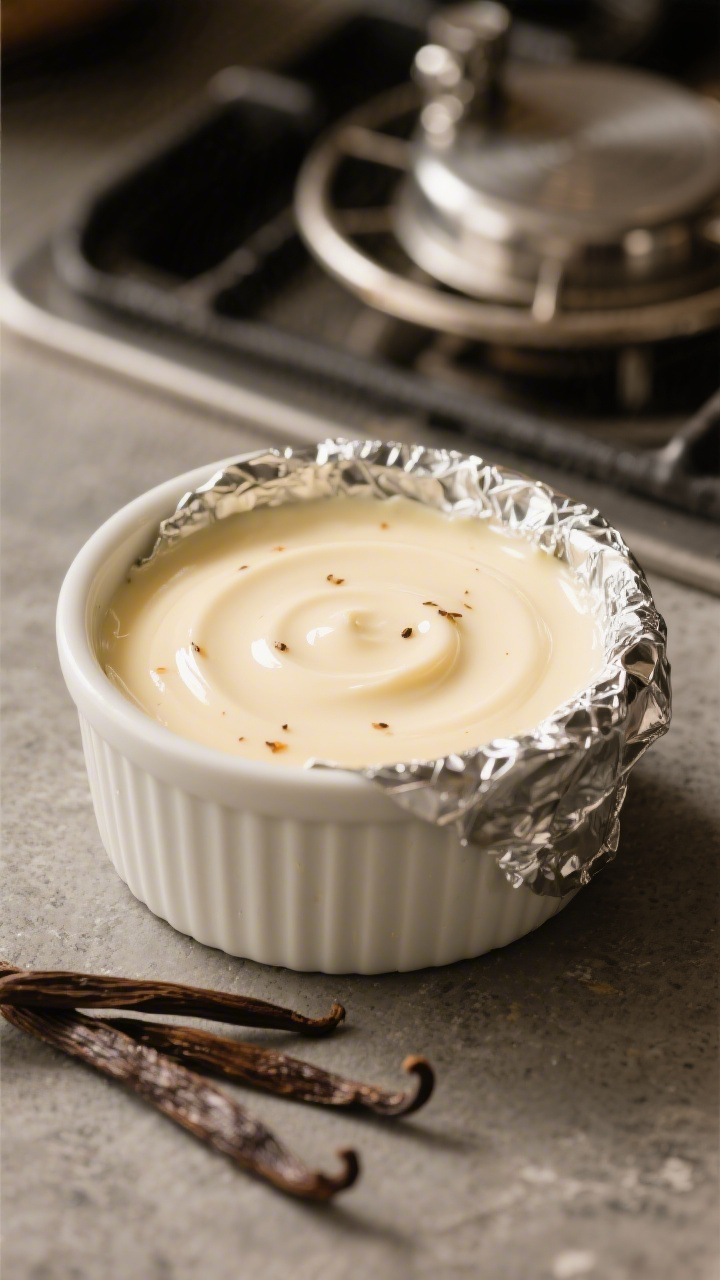
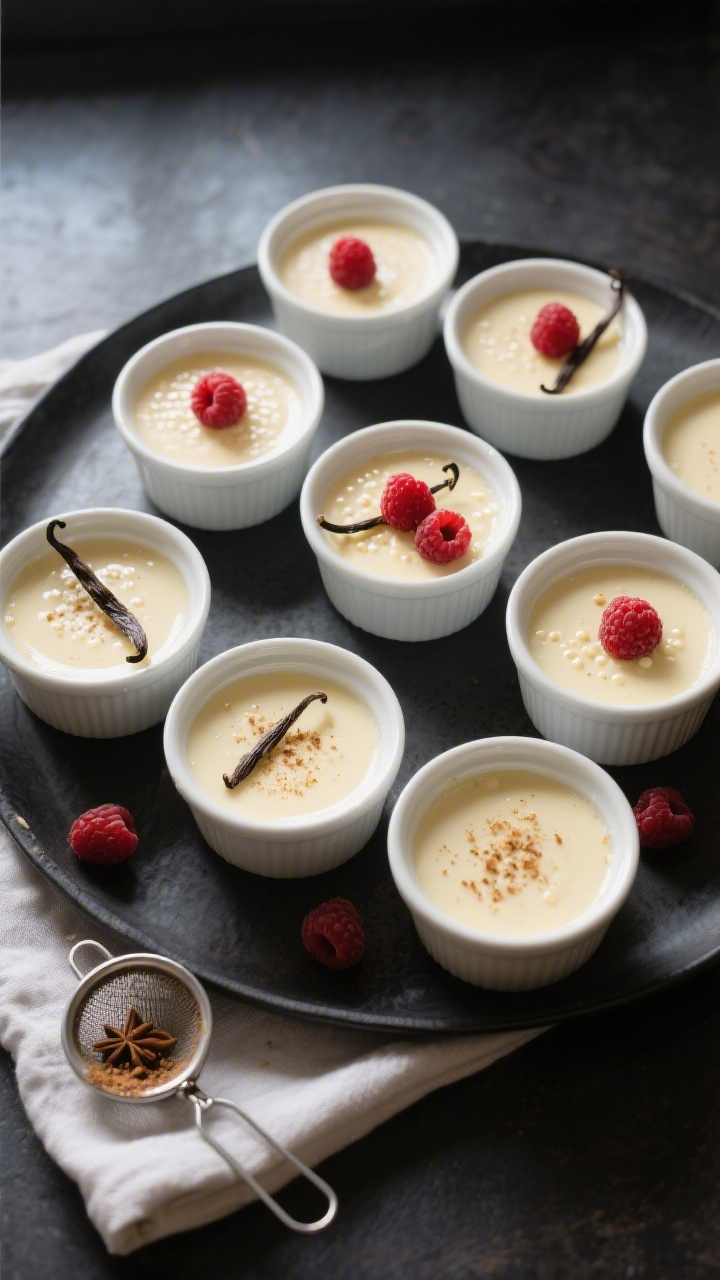
- Fill the ramekins: Divide the custard evenly among the prepared ramekins, leaving a small gap at the top. Skim any surface bubbles with a spoon for the smoothest finish.
- Cover and load: Cover each ramekin tightly with foil to prevent condensation from dripping in. Arrange them on the trivet in the pressure cooker.
You may need to stack them in a second layer; keep them level.
- Pressure cook: Seal the cooker. Cook at high pressure for 5–7 minutes (electric models) or 4–5 minutes at high pressure on stovetop models. Thicker custards and larger ramekins may need the higher end of the range.
- Natural release: Let pressure release naturally for 8–10 minutes, then carefully quick release any remaining pressure.
Remove the ramekins with tongs.
- Check doneness: The centers should quiver like gelatin when gently jiggled, not slosh. If they’re too loose, re-cover and cook under pressure 1–2 minutes more with a brief natural release.
- Cool and chill: Uncover and cool to room temperature, then refrigerate at least 2 hours. Custard thickens as it chills.
Top with a whisper of nutmeg or a few raspberries before serving.
How to Store
- Refrigerate: Cover tightly and chill for up to 4 days. Keep ramekins sealed to prevent absorbing fridge odors.
- No freezing: Custard tends to split and turn grainy when frozen. Enjoy it fresh or within a few days.
- Make ahead: Cook the day before serving for the cleanest set and best flavor development.
Health Benefits
- Protein from egg yolks: Egg yolks provide high-quality protein to support muscle repair and satiety.
- Calcium-rich: Dairy offers calcium and vitamin D (if fortified), supporting bones and teeth.
- Portion control: Individual ramekins help you enjoy dessert mindfully without overdoing it.
- Real ingredients: Using real vanilla and simple pantry staples keeps additives low and flavor high.
Common Mistakes to Avoid
- Overheating the dairy: Boiling milk can curdle proteins and create a cooked-milk taste.
Keep it just below a simmer.
- Skipping the tempering step: Pouring hot liquid in too fast scrambles the eggs. Go slow and whisk constantly.
- Not straining: Even careful cooks get tiny egg bits. Straining guarantees a silky custard.
- Overcooking: Custard sets as it cools.
Stop when it still has a gentle wobble, or it will turn rubbery.
- Forgetting the foil: Uncovered ramekins invite water droplets, which create pockmarks and a wet surface.
Recipe Variations
- Vanilla bean + citrus: Add 1 teaspoon finely grated orange or lemon zest to the warm dairy for a bright note.
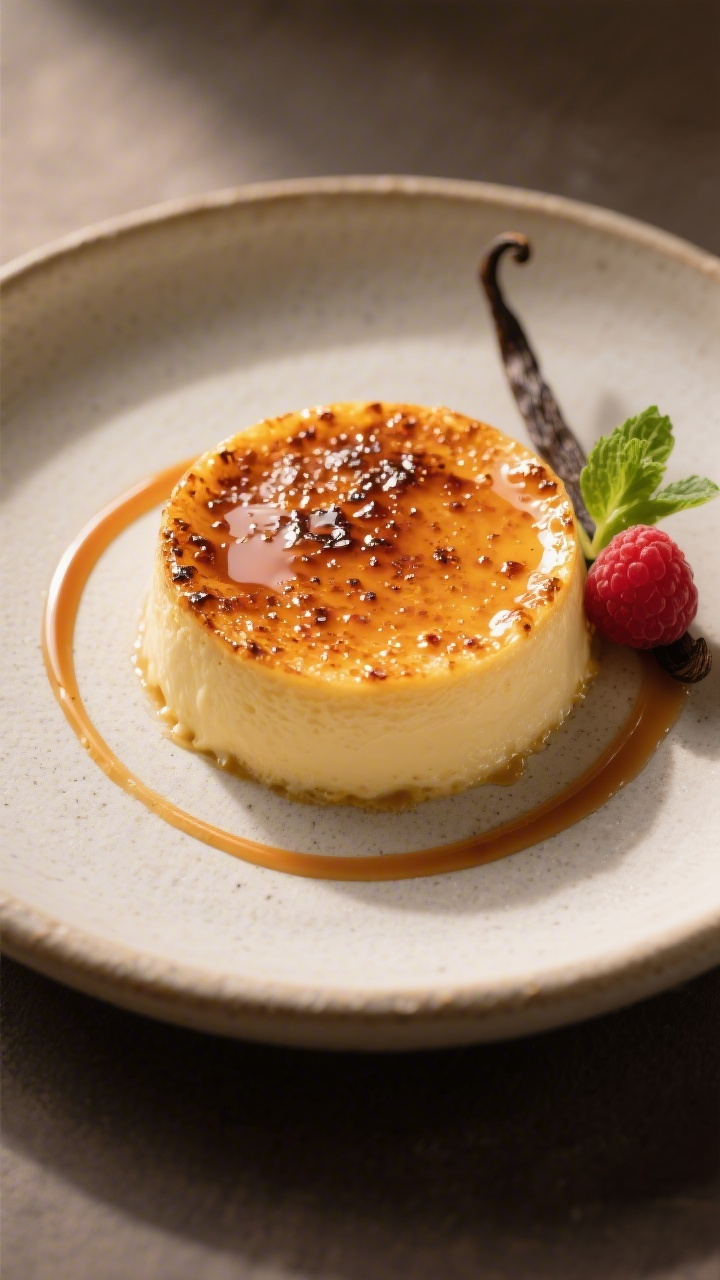
- Caramel bottom: Spoon a thin layer of warm caramel into ramekins before adding custard for a crème caramel vibe.
- Maple custard: Replace half the sugar with pure maple syrup. Reduce dairy by 2 tablespoons to balance extra liquid.
- Spiced chai: Steep a chai tea bag or a mix of cinnamon, cardamom, and ginger in the warm dairy, then strain well.
- Dairy-light: Use 2 cups whole milk plus 1/2 cup cream for a lighter texture. Avoid nonfat milk; it won’t set as luxuriously.
- Brûléed top: Chill, then sprinkle sugar over the surface and torch until glassy for a crème brûlée finish.
FAQ
Can I use only milk instead of cream?
Yes.
The texture will be lighter and a bit less rich, but still delicious. Whole milk works best. Avoid nonfat, which can taste thin and set weakly.
What size ramekins should I use?
Four- to six-ounce ramekins are ideal.
Smaller ones cook quicker, so check at the low end of the time range. Larger ones may need 1–2 extra minutes.
How do I fix custard that’s too loose?
Cover with foil again and return the ramekins to the pressure cooker for 1–2 more minutes at high pressure, followed by a short natural release. Chill fully before judging the set.
Why did my custard turn grainy?
It likely overheated or overcooked.
Next time, keep dairy just below a simmer, temper slowly, and stop cooking when the center still has a soft wobble.
Can I make this without a vanilla bean?
Absolutely. Use 2 teaspoons of good-quality pure vanilla extract. Add it after warming the dairy, when you combine with the yolks.
Do I need to cover the ramekins with foil?
Yes.
Foil prevents condensation from dripping onto the surface, which helps maintain a smooth, glossy top and consistent texture.
Is this safe to stack in the pressure cooker?
Yes, as long as the ramekins are level and stable. You can use a second trivet between layers if you have one, but it’s not essential.
Wrapping Up
This pressure-cooker vanilla bean custard brings classic pastry-shop luxury to your kitchen with minimal fuss. It’s smooth, fragrant, and ready in a fraction of the usual time.
Keep the method in your back pocket, and swap flavors as you please. A few simple steps, and you’ll have a dependable, elegant dessert any night of the week.
Printable Recipe Card
Want just the essential recipe details without scrolling through the article? Get our printable recipe card with just the ingredients and instructions.